Battery switch on travel trailer function is crucial for managing your RV’s power. This guide dives into the hows and whys of these switches, covering different types, wiring diagrams, troubleshooting, maintenance, and safety. We’ll explore how they interact with other systems like solar panels and inverters, and help you understand the best practices for different battery types, ensuring your travel trailer’s electrical system runs smoothly and efficiently.
Whether you’re a seasoned RVer or a newbie, understanding your battery switch is essential for preventing electrical problems and maximizing your off-grid adventures. We’ll cover everything from basic functionality to advanced troubleshooting techniques, making sure you’re equipped to handle any situation.
Understanding Battery Switch Functionality in Travel Trailers: Battery Switch On Travel Trailer Function

Your travel trailer’s battery switch is a crucial component, managing power flow between your house batteries (powering interior lights, appliances, etc.) and your chassis battery (powering engine starting). Understanding its function ensures safe and efficient power management. This guide explains the different types, wiring, and operation of these switches.
Types of Battery Switches Used in Travel Trailers
Travel trailers typically utilize one of three main types of battery switches: a simple on/off switch, a two-battery switch, and a more sophisticated selector switch with additional features like an “off” position for both batteries. A simple on/off switch only allows you to completely disconnect the battery from the system, while a two-battery switch allows you to select between the house battery bank and the chassis battery, or to disconnect both.
More advanced switches may offer additional options, such as connecting both banks together for combined power.
Typical Wiring Diagrams for a 12V System with a Battery Switch
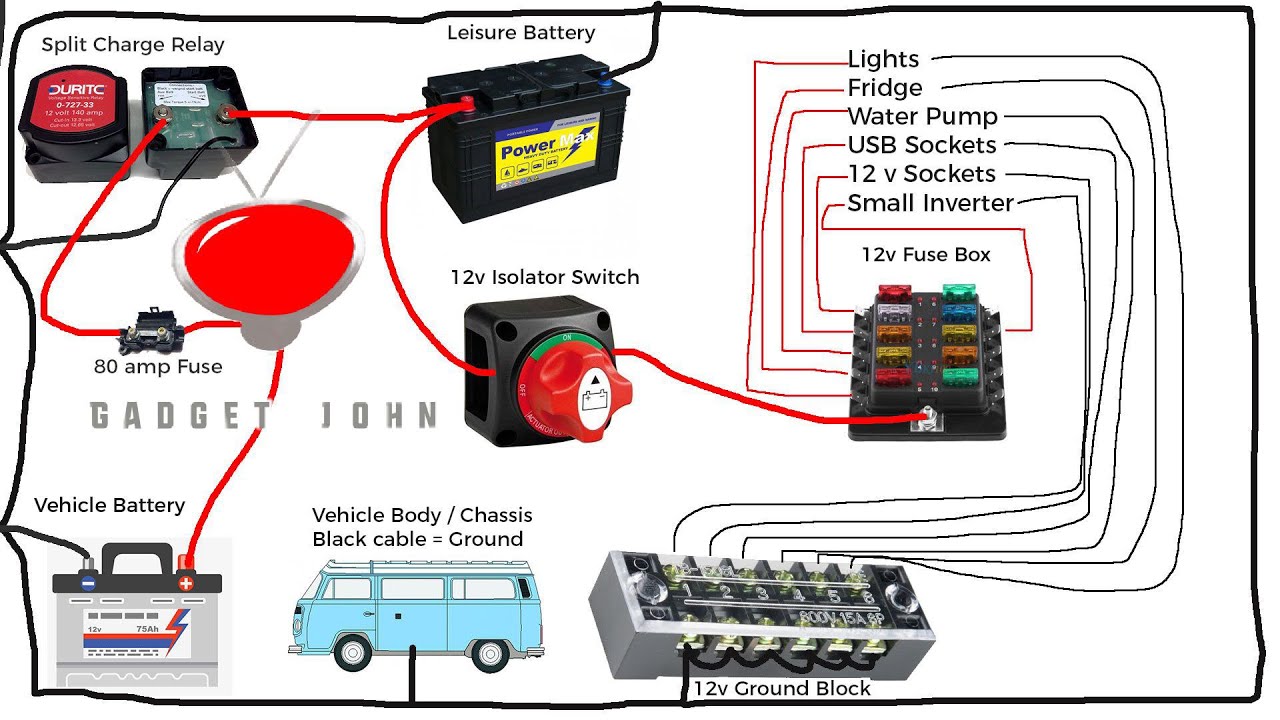
A typical 12V system will have a negative (-) and positive (+) wire running from each battery to the switch. The switch then directs power to the various circuits in the trailer. The chassis battery typically feeds the starting system and is often connected directly to the trailer’s starting system, bypassing the battery switch. The house battery bank provides power to the trailer’s interior systems.
So, you’re an audiophile who loves to travel? Awesome! Check out this guide on creating the perfect audiophile travel setup for your next adventure. It’s all about finding that sweet spot between portability and sound quality. Then, if you’re more into rugged adventures, consider the tips offered in this other guide on audiophile travel aetup for more durable and resilient equipment.
Remember, great sound doesn’t have to stay at home!
A properly wired system will incorporate fuses and circuit breakers to protect against overloads and short circuits. A visual representation would show the batteries (house and chassis) connected via positive and negative leads to a switch, and then from the switch, positive and negative leads going to the house electrical system. Additional fuses would be included along the positive lines.
Switching Between Battery Banks (House and Chassis)
Switching between battery banks is usually a straightforward process. For a two-battery switch, you’ll typically find positions for “House,” “Both,” “Chassis,” and “Off.” The “House” position connects only the house battery bank, “Chassis” connects only the chassis battery, “Both” connects both banks, and “Off” disconnects both. Always consult your trailer’s manual for the specific switch positions and their functions, as they can vary slightly between models.
Connecting a New Battery to the System
1. Disconnect
Completely disconnect the negative (-) cable from the battery you are replacing.
2. Remove
Carefully remove the old battery.
3. Install
Install the new battery, ensuring it is securely mounted and the terminals are clean.
4. Connect
Connect the negative (-) cable to the new battery. Then, connect the positive (+) cable.
5. Check
Verify all connections are tight and secure.
6. Test
Turn on your battery switch to test functionality. Check your trailer’s systems to confirm power is working correctly.
So, you’re an audiophile who loves to travel? Awesome! Check out this guide on building the perfect audiophile travel setup for your next adventure. It covers everything from portable DACs to noise-canceling headphones. But wait, there’s more! If you’re into a more rugged, durable setup, consider looking at the options for a military-grade audiophile travel setup – perfect for those who need something that can withstand the harshest conditions.
Both resources will help you find the best sound on the go!
Comparison of Battery Switch Types
| Switch Type | Features | Benefits | Drawbacks |
|---|---|---|---|
| Simple On/Off | Turns the battery completely on or off. | Simple, inexpensive. | Limited functionality; no selection between battery banks. |
| Two-Battery Switch | Selects between house and chassis batteries, or disconnects both. | Allows for independent control of battery banks. | May not offer combined power option. |
| Advanced Selector Switch | Offers multiple options including combined power, separate banks, and complete disconnect. | Most versatile; allows for maximum flexibility in power management. | More expensive than simpler switches. |
Battery Switch and Electrical System Integration
The battery switch is the central control point for your travel trailer’s electrical system, but it doesn’t operate in isolation. Understanding its interaction with other components is crucial for safe and efficient power management. This section details how the battery switch integrates with the rest of your RV’s electrical setup, focusing on safety and preventative maintenance.
Your battery switch acts as the main on/off switch for your house batteries. This means everything downstream – lights, appliances, and charging systems – is directly affected by its position. How it interacts with other components depends on how your system is wired.
Inverter Interaction
Inverters convert DC power from your batteries to AC power for running devices like laptops, microwaves, and coffee makers. The battery switch controls the DC power supply to the inverter. If the switch is off, the inverter won’t have power, even if it’s turned on. A properly wired system will have fuses or circuit breakers protecting both the battery switch and the inverter’s input lines.
This prevents overloads that could damage the inverter or even start a fire. For instance, a 1500-watt inverter might require a 30-amp fuse on its input line, preventing excessive current draw from the batteries.
Solar Panel Integration
Solar panels generate DC power and typically charge your house batteries directly. However, the interaction with the battery switch varies depending on the system design. In some setups, the solar charge controller is wired so that the solar panels only charge the batteries when the battery switch is turned on. In other setups, the solar charge controller charges the batteries regardless of the battery switch position.
This difference in wiring is important to consider when diagnosing charging problems. For example, if your batteries aren’t charging and the switch is off, check if your system is wired to charge regardless of the switch.
Fuse and Circuit Breaker Protection
Fuses and circuit breakers are essential safety devices. They protect the wiring and components from damage due to overloads and short circuits. The battery switch itself often has a large fuse or circuit breaker protecting the main power line from the batteries. Individual circuits for lights, appliances, and other systems have their own fuses or circuit breakers.
These prevent a single faulty appliance from taking down the entire system. For example, a short circuit in a light fixture would blow its dedicated fuse instead of causing a larger fire.
Grounding Importance
Proper grounding is critical for safety and preventing electrical shocks. The entire electrical system, including the battery switch, should be connected to a solid ground point. This provides a path for fault currents to flow safely to the ground, preventing dangerous voltages from accumulating on exposed metal parts. A poorly grounded system can lead to shocks, damaged equipment, and even fires.
Ensuring a clean, secure ground connection on the chassis of the trailer is crucial.
Preventing Corrosion
Corrosion on battery terminals and switch connections can lead to poor electrical contact, overheating, and even fires. To prevent corrosion, keep the terminals and connections clean and use anti-corrosion products. Applying a dielectric grease to the terminals and connections creates a protective barrier and prevents corrosion. Regularly inspecting and cleaning the connections is a simple preventative maintenance step that will extend the life of your system.
For example, a wire brush can remove surface corrosion, followed by application of a corrosion inhibitor.
Safety Precautions
Working with batteries and electrical systems requires caution.
Always disconnect the negative battery terminal before working on any part of the electrical system. This is a fundamental safety procedure to prevent accidental shorts and shocks. Never work on a wet or damp system. Use insulated tools and wear appropriate safety glasses. If you’re unsure about any aspect of your electrical system, consult a qualified RV technician.
Improper handling can lead to serious injury or damage. Always refer to the manufacturer’s instructions for your specific components. When in doubt, seek professional help.
Battery Switch and Different Battery Types
Using a battery switch in your travel trailer becomes more complex when you consider different battery types. The most common are lead-acid (flooded, gel, AGM) and lithium. Each has unique charging characteristics that impact how you should manage your battery bank and use your switch. Understanding these differences is key to maximizing your battery life and avoiding damage.
The primary difference lies in their voltage and charging profiles. Lead-acid batteries generally operate at 12V, while some lithium batteries are 12V, and others are 24V or even 48V. This voltage difference is a critical consideration when configuring your battery switch. Additionally, lead-acid batteries require a more gentle charging process compared to lithium batteries, which can handle faster charging rates and higher voltages.
Lead-Acid Battery Charging with a Battery Switch
Lead-acid batteries are sensitive to overcharging. Using a battery switch with lead-acid batteries requires careful attention to charging current and voltage. The switch itself doesn’t directly control charging; it only isolates or connects the batteries to the charging source and the trailer’s electrical system. You’ll need a charger designed for lead-acid batteries that automatically regulates voltage and current to prevent damage.
A three-stage charging profile (bulk, absorption, float) is ideal. The battery switch simply allows you to select which battery bank (or both) receives charging power. Incorrectly configuring the switch won’t damage the batteries directly but can lead to overcharging if you’re not mindful of your charging setup.
Lithium Battery Charging with a Battery Switch
Lithium batteries generally accept higher charging currents and voltages than lead-acid batteries. They also offer advantages like faster charging times and longer lifespan. However, lithium batteries are sensitive to overcharging and require a Battery Management System (BMS) to regulate voltage, current, and temperature. The BMS is crucial for preventing damage and maximizing the battery’s life. The battery switch plays a similar role as with lead-acid: it connects or isolates the battery bank to the charging source and the trailer’s electrical system.
However, ensuring your charger is compatible with the lithium battery’s specific voltage and charging requirements (often higher voltage and faster charging rates) is critical. Using an incompatible charger can damage the battery and even pose a safety hazard.
Dual-Battery System with Different Chemistries, Battery switch on travel trailer function
Setting up a dual-battery system with different chemistries (e.g., one lead-acid and one lithium) requires a more sophisticated approach. You’ll need separate chargers for each battery type, each configured to the correct voltage and charging profile. The battery switch will allow you to isolate or connect each battery bank independently. A common configuration involves using a battery switch to select between the lead-acid and lithium battery banks, allowing you to charge each independently using its appropriate charger.
This prevents the risk of damaging one battery type by using a charger designed for the other. It’s crucial to ensure that the charging system and the battery switch are correctly wired to avoid any cross-connections that could lead to issues.
Appropriate Charging Procedures for Different Battery Types
Charging procedures must always align with the battery’s specifications. For lead-acid, use a charger specifically designed for flooded, gel, or AGM types, depending on your battery. Follow the charger’s instructions for proper voltage and current settings. For lithium batteries, always use a charger designed for lithium batteries and follow the manufacturer’s guidelines for charging current and voltage.
Never attempt to charge a lithium battery with a lead-acid charger, and vice-versa. The BMS within the lithium battery will play a crucial role in managing the charging process, but it’s still essential to use a compatible charger. Regular monitoring of battery voltage and temperature during charging is always a good practice.
Visual Representation of Battery Switch Systems
Understanding the physical layout of your travel trailer’s battery switch is crucial for safe and efficient operation. This section provides a detailed visual description of a typical setup, helping you identify components and understand their function.
A typical battery switch in a travel trailer is usually a relatively small, robustly built box, often made of metal or heavy-duty plastic, designed to withstand the rigors of outdoor use. Its location varies depending on the trailer’s design, but it’s frequently found near the batteries themselves, often within a dedicated battery compartment or easily accessible under a hinged access panel.
This placement minimizes wiring length and makes maintenance simpler.
Battery Switch Components and Functions
Several key components work together to control power flow through the battery switch. A clear understanding of these components is essential for troubleshooting and maintenance.
| Component | Description | Function | Visual Representation |
|---|---|---|---|
| Switch Lever/Dial | A lever or rotary dial that allows the user to select different positions, typically “Off,” “Battery 1,” “Battery 2,” and “Both.” | Controls the flow of electricity from the batteries to the trailer’s electrical system. | A sturdy, clearly labeled lever or dial, possibly with a locking mechanism to prevent accidental changes. Often features symbols representing the different positions (e.g., a battery symbol for each battery, a combined battery symbol for “Both,” and a crossed-out battery symbol for “Off”). |
| Terminals (Positive and Negative) | Heavy-duty metal posts or clamps, usually clearly marked with “+” and “-” symbols. | Provide connection points for the battery cables. The positive terminals are usually larger and sometimes color-coded red. | Thick, robust metal posts or clamps, often with threaded holes for securing battery cables using bolts or nuts. May have a protective coating or insulation around the base. |
| Battery Cables | Thick, insulated cables connecting the batteries to the switch. These are usually heavy-gauge wire to handle the current demands. | Carry the electrical current from the batteries to the switch and then to the trailer’s electrical system. | Thick, flexible cables with clearly visible insulation (usually black for negative and red for positive). May be protected by a corrugated sheath or other form of protection, particularly in areas prone to abrasion. |
| Internal Wiring | The internal wiring connects the switch lever/dial to the terminals, controlling the path of the electrical current. | This internal circuitry is usually not visible without opening the switch enclosure. | A network of heavy-gauge wires, neatly bundled and securely fastened within the switch enclosure. The wiring pattern will vary depending on the switch design, but generally connects the switch lever to the various terminal connections. |
Diagram of Electricity Flow
The following diagram illustrates the path of electricity through a typical dual-battery switch system.
| Component | Battery 1 | Battery 2 | Trailer System |
|---|---|---|---|
| Positive (+) Cable | Connected to (+) terminal on Battery 1 | Connected to (+) terminal on Battery 2 | Connected to (+) terminal on trailer system |
| Battery Switch | Switch controls connection to (+) terminal on trailer system | Switch controls connection to (+) terminal on trailer system | Receives power from selected battery(ies) |
| Negative (-) Cable | Connected to (-) terminal on Battery 1 | Connected to (-) terminal on Battery 2 | Connected to (-) terminal on trailer system (ground) |
Mastering your travel trailer’s battery switch isn’t just about avoiding dead batteries; it’s about maximizing your enjoyment of the RV lifestyle. By understanding its function, troubleshooting common issues, and performing regular maintenance, you can ensure reliable power for all your adventures. Remember, safety is paramount when working with electrical systems, so always take necessary precautions. Happy travels!
Q&A
What happens if my battery switch is left in the “off” position?
Leaving the switch off completely disconnects both your house and chassis batteries, preventing any power drain, but also leaving you without power to anything connected to those batteries.
Can I use a battery switch with different battery types (e.g., lead-acid and lithium)?
It’s generally not recommended to directly connect vastly different battery chemistries (like lead-acid and lithium) to the same battery switch without appropriate voltage and charging management systems in place. Improper charging could damage one or both battery types.
How often should I inspect my battery switch and connections?
Ideally, inspect your battery switch and connections at least every three months or before and after each extended trip. Look for corrosion, loose connections, and any signs of damage.
What should I do if my battery switch feels stiff or difficult to operate?
A stiff switch might indicate corrosion or a mechanical problem. Try cleaning the switch contacts and lubricating the mechanism (if applicable). If the problem persists, replacement might be necessary.
